Sharing is caring!
**********************
I think it would be pretty awesome to come up with a list called “One Hundred Things to do with Onesies.” There are so many things! Here’s one today.
Supplies needed:
- White onesie
- Old cereal box
- Electric tape
- RIT fabric dye
- Spritz bottle
- Old rags
 |
| Step 1: Start with a clean, white onesie. Cut some cardboard from a cereal box and put it inside the onesie to prevent bleeding. |
 |
| Step 2: Get out your RIT color dye of choice and your little spritz bottle |
 |
| Step 3: Mix up some dye. I use hot water, a tiny bit of salt, and at least 1/2 of the package. The lighter the color you want, the less dye you use (and vice versa.) |
 |
| Step 4: Lay your onesie down on an ugly purple rag towel. It is essential that it is purple and ugly. Get your electric tape and start taping your stripes. You could cut your tape different widths to get some variation in your stripes. Leave some hanging over so you can match up the front and back stripes. Make sure to tuck the back snappy part under the cardboard. Try to not imagine your baby as a prison inmate. |
 |
| Step 5: Start spritzing your onesie until you get it how you like it. You need to do it pretty dark, because RIT dye is not colorfast and it will fade when you wash it. After you get it how you like it, dab the excess dye (sitting on the electric tape) with a rag. The lay it somewhere to dry for a good while. |
 |
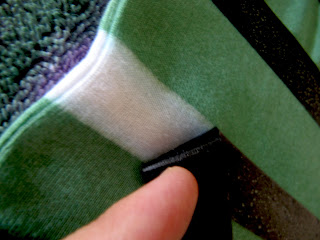
| Step 6: After it’s dried, you can sneak a peek at your stripes. Looking good! Put the tape back…don’t remove it yet! |
 |
| Step 7: Flip your onesie over. You can see the cool outline on the towel. Tape the backside, matching up your tape ends, and bringing out the long end with snaps to stripe as well. |
 |
| Step 8: Spritz again. By the way, these cheap spritzers are annoying to use, once the dye starts running low, you have to open the cap a lot to put the air back in the create the pressure to spritz. Use all your dye. After you can’t spritz anymore, you can open up the bottle and drip the rest on the hemming. I think you can try different kinds of bottle, like a small sprayer. Dab the excess…let it dry. And don’t remove the cardboard until it’s really dry. |
 |
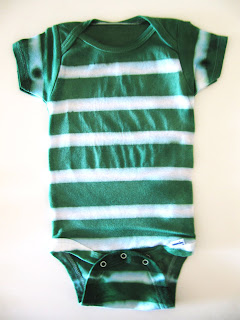
| Step 9: Once it’s completely dry, carefully remove the tape. Taking a hot iron, iron your onesie slowly, to seal in the color. Make sure the steam is up really high. Before you let your baby wear it, wash it in warm water with a tiny bit of detergent (by itself) and tumble dry. I had some leakage in the sleeves, but I think it adds to the character of the onesie. Also, the white isn’t completely white, it has blue twinges to it. After I washed it, it was definitely lighter, so I think I might use more dye next time and really spray it good, even maybe doing a couple coats. I looked into dye fixative, but they contain formaldehyde, which is a carcinogen, so I definitely didn’t want that anywhere near a baby. |
 |
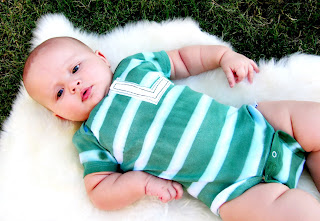
| I added an applique “L” to mine, for Lukey. |
 |
| Super chubs! That onesie looks awesome! So rugby. |
 |
| He wasn’t super smiley this time…he usually is. Maybe because he REFUSES TO NAP!! |
 |
| …I had to add this pic because at the last second my two-year-old snuck his Froggy into the picture. Ha! |
And I wanna hear all your ideas for what to do with a onesie. You don’t have to submit a tut, just an idea.


Oh my goodness… I don't know which one is cuter… the onesie or that baby! Thank you for the tutorial. It's always nice to see other ways to use a plain white onesie!
I love it! Your little one is so adorable! I want to make a t-shirt for my little one! Thank you for sharing!
oh my I love this def. will be picking up dye and onsies when i go out friday!!!!
ABSOLUTELY ADORABLE!! Heidi thanks so much for sharing this…I'll be linking.
I really like this! Great idea 🙂
k, love the onesie idea…so cute. BUT, I absolutley love that Froggy is in the last picture. That is incredibly classic.
I've tried spritzing with dye before and it always bleeds. I think it adds to the character of the onesie. Maybe fabric spray paint would keep the lines crisp. I'll have to try it. Thanks for the great idea! I love the applique initial too!
Jenifer
Cantaloupe Corner
Super cute Heidi! I love it!
This is super cute! I thought I read somewhere that vinegar will set the dye.. or am I dreaming? Hm.. will have to check on that.
Soak whatever you are dying in a salt water solutions before you dye it. It will give to a brighter color and no running.
Love your blog! I have given you an award. http://www.allthingsrobbin.blogspot.com
LouAnne and "D"
You should check out this site: http://www.pburch.net/dyeing.shtml
I found this after I did this project and actually learned a lot of things I should have done differently…but I still think my project turned out okay. This site says that vinegar and salt don't seem to do anything for all-purpose dye (which RIT is). But maybe I will try soaking the garment in salt water next time as an experiment. Thanks!
Robbin,
Thanks! Your blog is cute—you are super crafty!
so glad I ran across your blog and tutorial today! I have a stack of onesies waiting to be snazzed up! I will definitely be doing this for a few of them! What a clever idea, but I'm going to have to wait til I get myself an ugly purple towel. I did a SIMPLE project with a plain striped onesie myself just today! Come visit at itstoilegood.blogspot.com and take a peek! Looking forward to learning more from you and your blog – now following!!
so so cute! i LOVE the little "pout" on your baby's face! what a great tutorial! I did a tie-dye onesie a couple of weeks ago, as my hubby, me, and my 3 month old went to an 80's party–i couldn't not have my baby dressed up, too! it turned out pretty cute!
Cute idea! My little guys is out of onesies now (he's small but cloth diapers and a big head make them too small) for ideas though, you can take one apart for a pattern to make shirts (go to the Made blog, she has a great tute on it. I had to make a bunch for my little guy, I'll be posting about it on my blog as soon as I get it all ready) So my little guy's shirts all have a top like a onesie. The Mr. Man ties are always cute to applique on, and right now I'm on a freezer paper kick. I'll have to get my butt in gear and post some of these soon.
What a great idea! I've dyed onesies before but never with stripes. I am having a boy in December and think this would be so fun for him to wear in the spring. Thanks for the great tutorial!
Head on over to my blog sometime.
justenoughstyle.blogspot.com
I just have to say I really enjoy reading your blog! You have some really great ideas!
You asked for things we have done with onesies. Well, I have put appliques on them, stamped them with fabric ink, dyed (like you did, but not stripes, I'll have to try that) and used iron on crayons – I let me older kids draw pictures for the baby and ironed them to a onesie for her to wear.
This project rocks! I just wanted to let you know that I featured this today on You Sew Rock Me Fridays. Here’s the link if you want to check it out: http://wp.me/s1VAkT-1183
Thanks!!
This is adorable!!
Heidi, LOVE your writing style, I LOL’d a good few time reading this tutorial 😉 I’m now sad I don’t have an ugly purple towel to use 🙁
Ha thanks! I wrote this post so long ago, my baby wearing this onesie is almost 5!
I can’t wait to try this .