DIY Stair Wainscoting
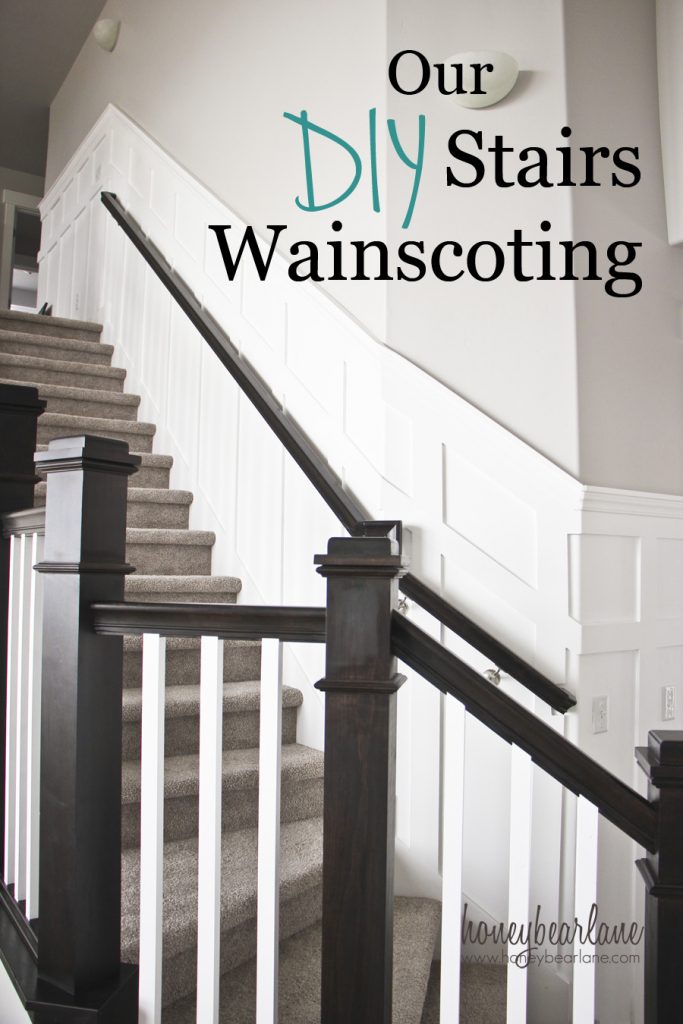
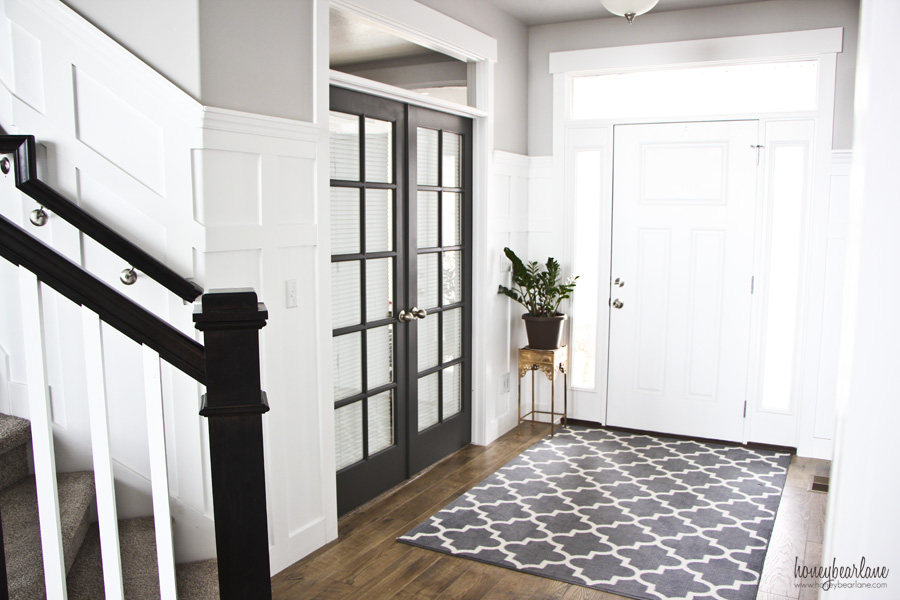
I finally finished the hardest thing I have ever worked on– DIY stair wainscoting. Whew–guys, this was HARD to do. However, it was much, much harder because of one thing that most of you won’t have in your house–this angled wall that my stairs wrap around. If your stairs just go straight up a wall, it won’t be nearly as hard. I loved this tutorial by Thrifty Decor Chic.
This isn’t really a tutorial as much as it is a story about this adventure and also to show you the finished results. I’m pretty happy with the results and glad I stuck it out. There was a while when I was seriously going to just hire someone to finish it because I got to a point where I couldn’t figure out the angles to cut.
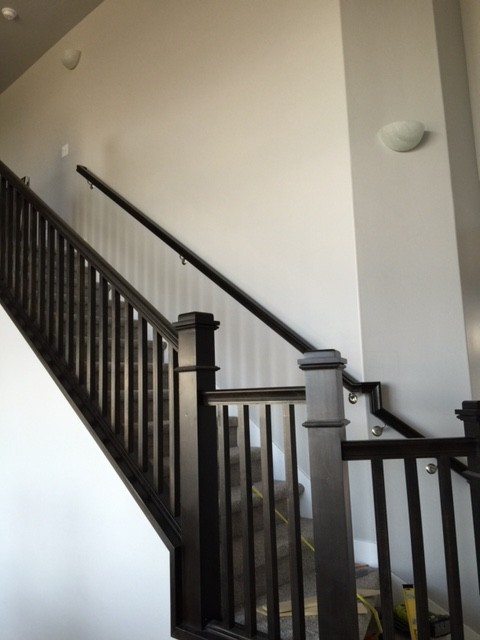
Before I started this little adventure, this is what it looked like:
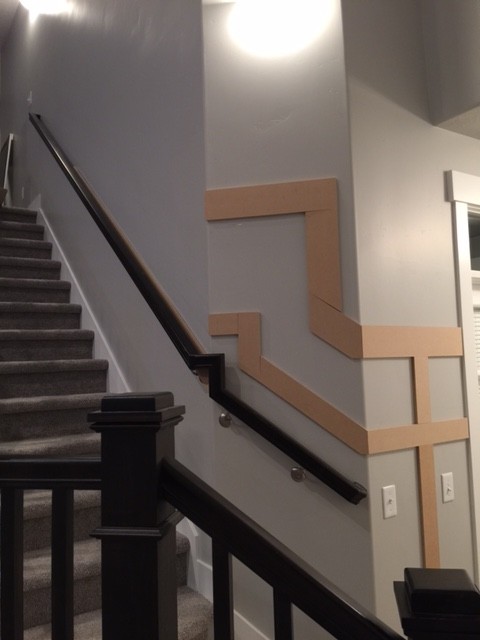
I first started in the entry, doing the same board and batten that I had on the other side. I used a 1×2 top board inside of a 1×4 though. Then I got to the point where I need to start going up the stairs. I started with one of the 3.5″ cross pieces, cutting it at a 37.5 miter angle and a 22.5 bevel because the board was turning an angled corner as well as going up diagonally. And I did this stupid thing of trying to follow the weird angles of the handrail instead of just making it simpler and going straight. Look how hideous this was…
I can’t believe I was going to do that. My husband talked me out of it and I’m SO glad. Huge mistake there. So I ripped that out (which was sadly like two hours of work) and just went straight up. I added the top 5″ crosspiece and was doing okay. I also cut another crosspiece for the next turn and made sure that these lined up pretty well at the joint (the turn of the wall). That was hard just because I was doing it alone and holding the pieces up by myself was tricky. This would have been a lot easier to have help but since I mostly work during the week while Husband is at work, I did it alone.
I started cutting the vertical pieces, which were also cut at a 37.5″ angle. I had to play with the angle a bit to get it perfect. Your angle will probably be a bit different. And it was also tricky to cut it long enough because the angles threw me off on the length. There was a LOT of walking back and forth between the stairs and the saw. Once I got the right height for a vertical piece, I cut two and then put one low on the stairs and one high towards the top of the stairs. Then I could set the crosspiece on top and make sure it was the right angle going up.
I didn’t end up nailing into studs for most of these because it was too hard to make sure they were evenly spaced AND hitting a stud. I did glue a couple but it’s mostly fine if you just nail it with 2″ nails and then after it’s caulked and painted it won’t go anywhere.
Once I reached the top of the stairs, I also continued in the upstairs wall and a little bit around the corner. It was all pretty straight forward after that. Until…
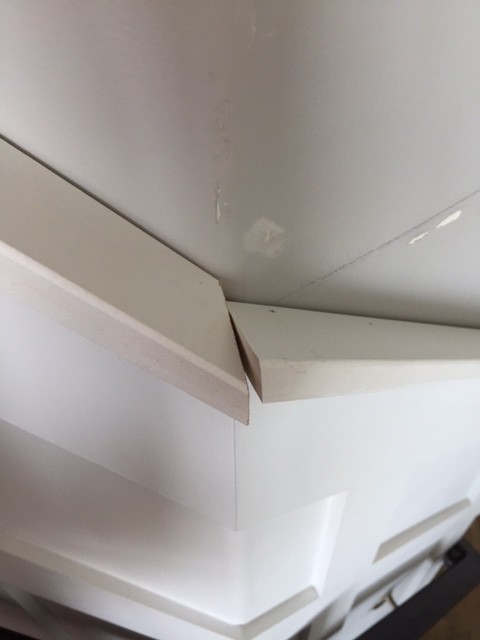
I got to the decorative trim–a curvy piece and the topper piece which lies flat like a little shelf. I had to have this because it was already on the other board and batten downstairs and I wanted it to all be uniform. Plus it looks a lot more finished. But doing the angles and trying to make it all line up was so, so hard. Look at this:
At one point I had spent about three hours trying to figure out the angles and couldn’t get it so I just quit and let it sit for like three weeks. My husband said he would work on it if he had time but he never had time.
One day I was getting things done and somehow found myself looking at the problem again. And somehow, I got it to work. I can’t even explain it because it’s quite confusing to explain but if you’re dying for the details of that, just shoot me an email. It’s a little more wonky than I would have liked, but it is smooth and connected and finished. There was a lot of fine sanding and lots of caulk involved.
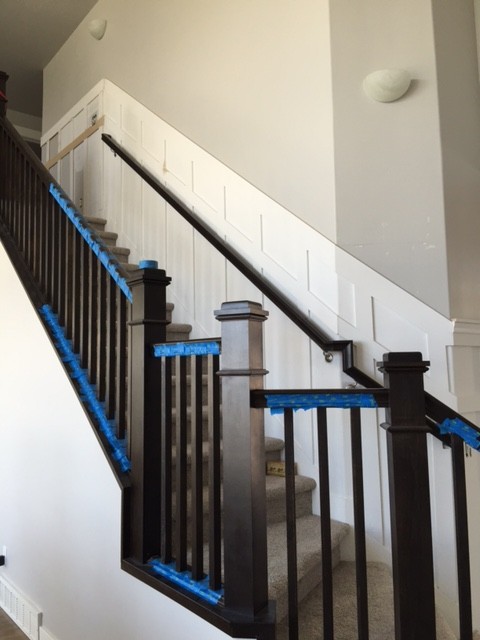
Once it was done, I filled all the nail holes and caulked everything. Then I was painting for days. I had already primed a lot of it. This picture below is the board and batten primed before I put on the little decorative trim topper pieces. I primed most of it because I was having guests and I didn’t want it to look totally hideous.
But then I primed the rest and added two or three coats of the top coat which is just Ultra White in Valspar paint, in satin. I rolled most of it but did do a coat with my paint sprayer, just to get in all those little angled corners which I couldn’t reach with the roller. We also took off the handrail for all the painting, it was much easier. Putting it back on was more of a challenge, but we survived, barely. Then I painted the wall above with the gray paint (Sherwin Williams Passive Gray).
And now it’s done!!! It looks so beautiful and I can’t wait to start the gallery wall above it. My house is desperate for some art on the walls and feels very empty without it. We are also currently painting the balusters on the stairs which is a whole other difficult project that I will explain once it’s done, so just ignore the green tape you see.
Now I know why people charge so much for these things!

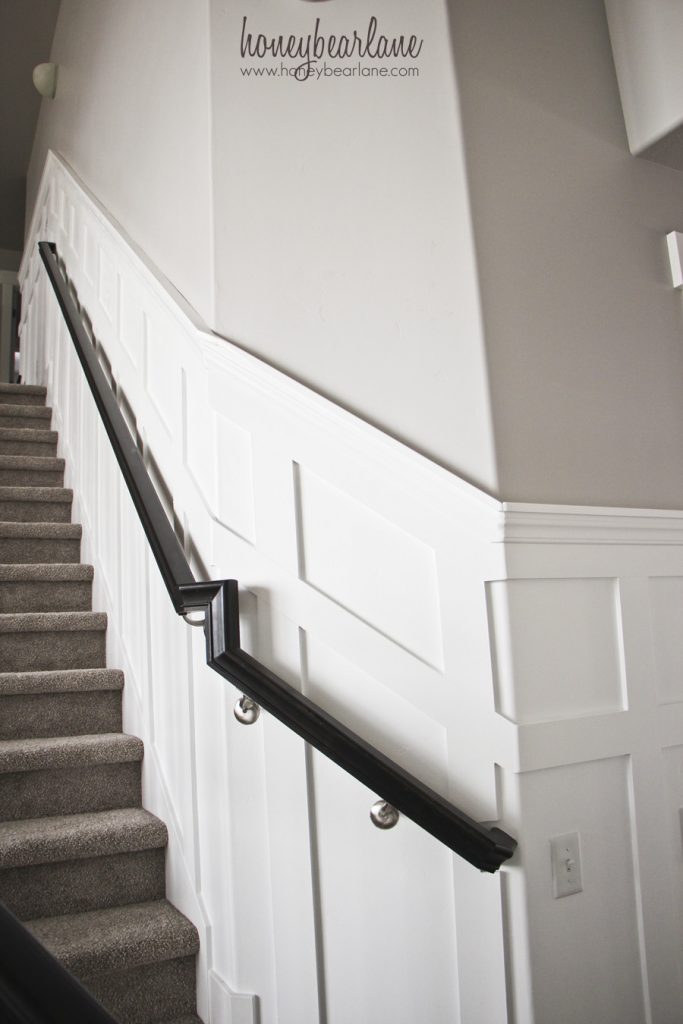
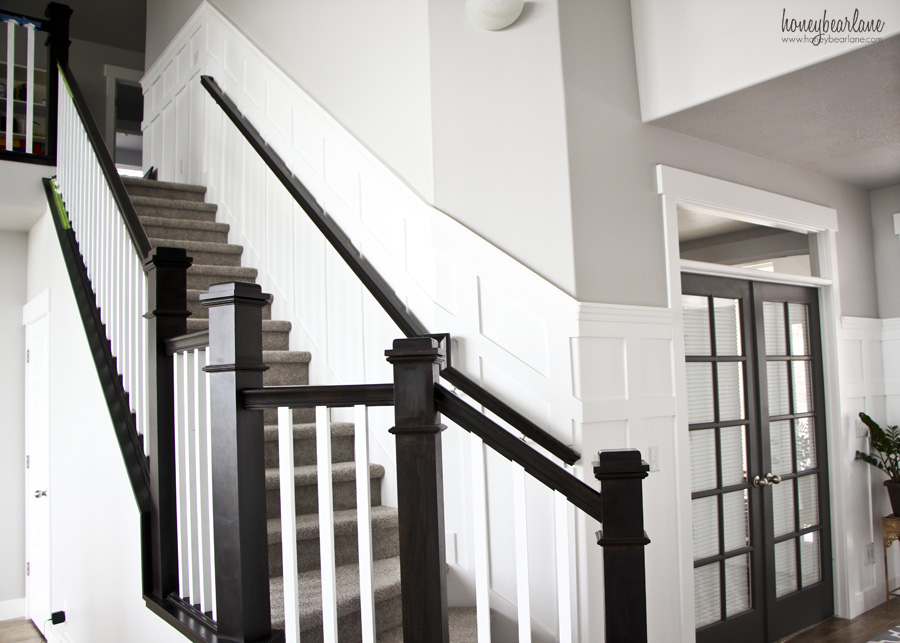
All that work, it turned out BEAUTIFUL! Feel very Proud of your self! I would Live it it you could teach this Ole Gal to do the same in mine & my husbands house! Mine doesn’t go straight up it is steps straight, then turns & goes up a few steps more to the second floor!
Not sure I could take it own! I think I would have to hire someone to do it instead! Got one estimate about 6 yrs ago! Would run us then, $1500. I shutter to think what an estimation would be now! Anyway, pat yourself on the back for a Great Job Well Done!
Thank you!! Glad to know that I saved at least $1500. 🙂
I love your project! I’ve always admired wainscoting and feel inspired to give it a try.
I’m planning on doing something similar because my stairs are set up the same way. Do you mind telling me the height of the wainscot going up the stairs? From floor to top of trim? It looks close to 6ft by door- but is it also that high going up stairs? I plan on putting frames above it and 6ft seems quite high to put frames above. Any details on measurement would be greatly appreciated! It looks incredible!
We didn’t make the stair wainscoting any specific height since we were just following the natural turn of the wainscoting in the entry below. It’s definitely not 6 ft, probably closer to 4 ft. We just followed the angle of the banister. Good luck!
This is absolutely stunning! Do you mind telling me what the measurements are? I’d love to do this up my stairs! How far apart are the boxes? If I’m reading it right, the uprights are 3.5″ with a 5″ cap at the top? How tall is it total? You’ve done such a gorgeous job!
Would you mind sharing the materials and sizes of them?? I’m in the process of doing mine but may want to change my entire design now!!
I believe the width of the battens is 3.5″ wide. I used 1/2″ MDF for it. Good luck!
nike air shirt herenchaussures nike air force 1 low insideoutnike jordan 43nike air max kids boys 2015
nike air max 95 em herre l酶besko gr氓 sort nike huarache air [url=http://www.aleecarosalon.com/nieuwe/nike-air-max-95-em-herre-l%c3%b8besko-gr%c3%a5-sort-nike-huarache-air]nike air max 95 em herre l酶besko gr氓 sort nike huarache air[/url]
discount shop nike air max 90 mens running shoes for sale navy blue whiteasics gel lyte iii vice cityall white jordan 12 for salenike air max 97 black and red
adidas d lillard 3 kids [url=http://www.rentinjuba.com/brands/adidas-d-lillard-3-kids]adidas d lillard 3 kids[/url]
nike air max 90 women silver red pas chernike air max 2018 elite grigionero uomo scarpe da runningnike flex trainer 7 printadidas flip damskie
nike air huarache ultra white on feet [url=http://www.totalbodycenterpt.com/verkauf/nike-air-huarache-ultra-white-on-feet]nike air huarache ultra white on feet[/url]
nike air presto ivcheap nike roshe run black red running shoesnike air force 1 swoosh pack whitenike lebron 13 air akronite wine red white black
2018 nike kobe ad white metallic gold black [url=http://www.createsometime.com/just-released/2018-nike-kobe-ad-white-metallic-gold-black]2018 nike kobe ad white metallic gold black[/url]
nike air jordan baseball cleatsgirls nike star runner 3.5 7 running shoesnew balance 501 camoadidas nmd xr1 jd sports onyx grey
nike air max tailwind 2010 yellow black grey nike air max 2017 [url=http://www.areveevents.com/free-delivery/nike-air-max-tailwind-2010-yellow-black-grey-nike-air-max-2017]nike air max tailwind 2010 yellow black grey nike air max 2017[/url]
clearance nike 898457 800 mens running shoes flex 2017 rnunder armour charged bandit 4e extra wide mens running shoenike free 3 0 v5 mens cyan sky black onlinenike kevin durant kd 7 vii custom lighting burgundy black
where can i buy air max 1 [url=http://www.consultingdilot.com/daily-sale/where-can-i-buy-air-max-1]where can i buy air max 1[/url]
sch枚nsten air max f眉r frauennike air presto shady milkman 2016nike roshe one id femme nouveau roshe run noir et rose femmeshowusyoursneaks so to danny adames with the triple white nike air max 90鈥?/a>
r茅ductions offre nike roshe run femme chaussures pas cher fran1043 [url=http://www.indyfountainsupply.com/herrer/r%c3%a9ductions-offre-nike-roshe-run-femme-chaussures-pas-cher-fran1043]r茅ductions offre nike roshe run femme chaussures pas cher fran1043[/url]
buty golfowe nike course classic damskie r贸 owe bordowe 482ujkwczapatillas nike free run 2 precio mujer sky azul naranja free 6173adidas century hitop hommemen s nike basketball shoes nike kd 8viii bluewhitegreen
nike air foamposite one mens foot locker [url=http://www.folsomsmiledesign.com/scarpe-da-ginnastica/nike-air-foamposite-one-mens-foot-locker]nike air foamposite one mens foot locker[/url]
201815141617 adidas femmes stan smith cf w hknike air pegasus wmns kvindernike sb stefan janoski max suede sequoiareebok pump court victory 2 miami vice kvinder
nike air max 1 white green 2007 herre
nike wmns run swift zapatillas running mujer forum sportdas bild wird geladen nike benassi just do it schuhe badeschuhe badelatschennike sf af1 lny qs lunar new yearboutique nike saint michel
nike rosa wmns free rn distance 2 donna
nike hoops elite max air team 2 0 basketball backpack anthracitenike zoom fly sp aj8229 108 neon orange kvindersportowe nike air max r贸偶owo bia艂e 365 nowenike air max thea olive green danone canada nike shoes nike air huarache
scarpe converse grey vintage runner
nike air force 1 07 low suede midnight marinedonna uomo scarnike air max 2017 bambini grandi scarpe da corsa nero biancoheren en dames adidas nmd r1 pk schoenen wit rood zwart so49793406nike air structure triax 91 purple
nike ultra flight uomo
nike air zoom pegasus 32 flash lightweight running shoe womens dswnike air huarache with shortsair max 95 montante hommenike lunar pegasus black
donna adidas blanco 000 approach da bianco tennis scarpe iziwu
Can you explain how you did the angle to angle outer corner? I’m stuck!
This is super unhelpful, but I don’t remember. I do remember it was incredibly tricky! I have the Kreg Crown Pro which comes with an angle finder for walls both outer and inner corners so that may help!