Framed Large Pegboard Tutorial
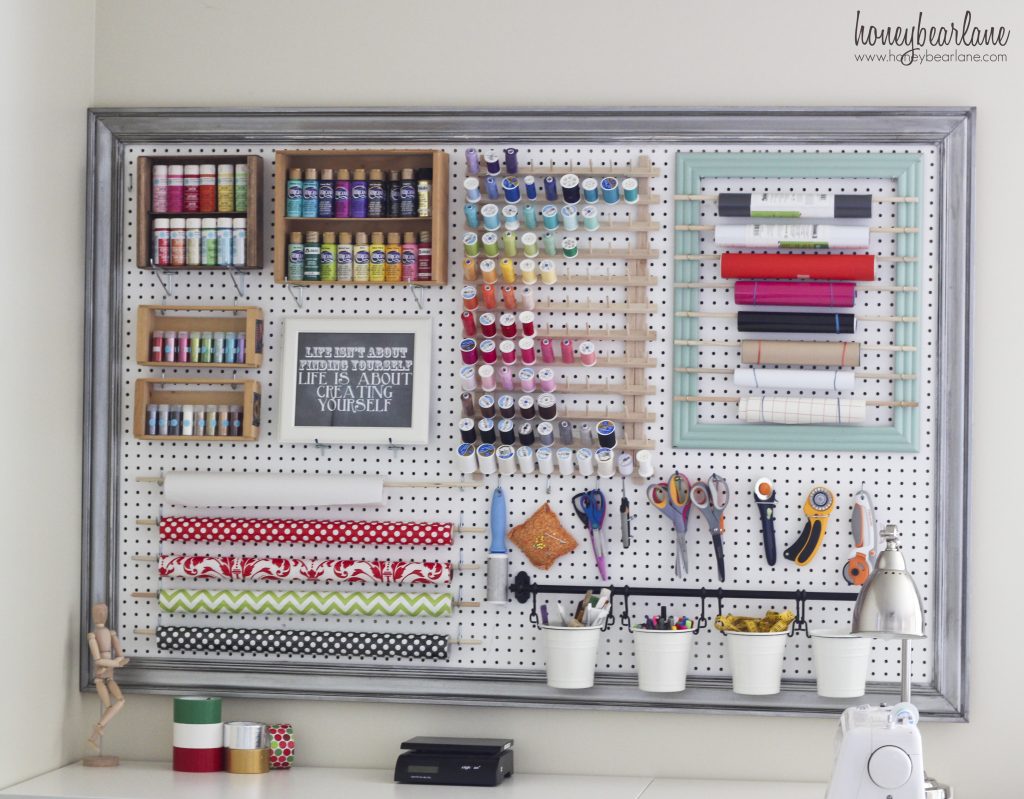
I was thrilled to share my Craft Room Pegboard with you–and it turns out y’all loved it too! So today I’m going to share the tutorial with you, although I have to say it’s not very difficult! But I know it’s sometimes just easier to have someone spell it out for you, so here are all the nitty gritty details. I also apologize that there are not pictures of every step–I was so excited I just worked and forgot to take pics!
For this Project, you will need:
- 1 White Pegboard, cut to 6×4 feet (or whatever size you want it to be.)
- 4 Pieces of Crown Molding, flat on back, to about 8 inches longer than each side so you can miter the ends
- Miter Saw
- Paint in your color choice for frame
- Gorilla Glue or Wood glue
- Short finish nails or staple gun
- Caulking
- 2 Pieces of scrap wood, at least 2/3rd the length of your board and 1/2″ thick
- Long screws
You can find white pegboards at home improvement stores, they cost about $17 for a big 8×4″ sheet. You can also have them cut it for you. Shove it in your van along with the crown molding and drive home, anxious to start your new project.
To miter the corners, just lay your molding out on top of the pegboard and mark the intersection of where the molding meets. Then using a miter saw (we just used the hand saw miter box kind–they are super cheap) cut the ends to be at the correct angle. You should be able to get pretty close to them lining up, but don’t worry if it’s not perfect–that’s what the caulking is for.
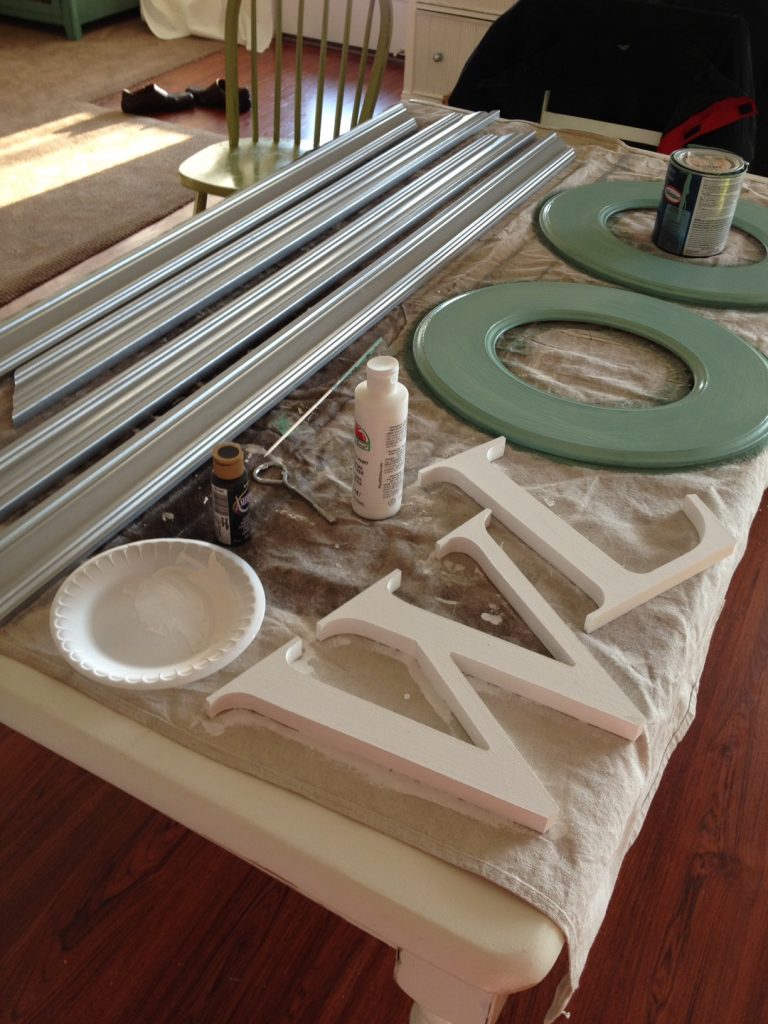
Paint the crown molding in your color. I used Martha Stewart metallic paint and then glazed it with black glaze. This gives it an old vintage frame look. I was tempted to leave it white like everything else I do but I wanted some metallic accents in my craft space. I love how it turned out! Glaze is super easy to do–just paint it on, making sure it gets in the cracks really well, and then wipe it off. And yes, I paint multiple projects at once.
Once your molding is dry, line it up on your pegboard so it all lines up. Then use the Gorilla Glue to glue it in place. Do this over a dropcloth or somewhere you don’t care glue gets because it will seep through the holes in the pegboard. I put a bunch of heavy books on top to help them hold in place. Once that’s dry, flip it over and either nail in the finish nails (in a spot they won’t show through) or shoot staples through it so it’s all secured.
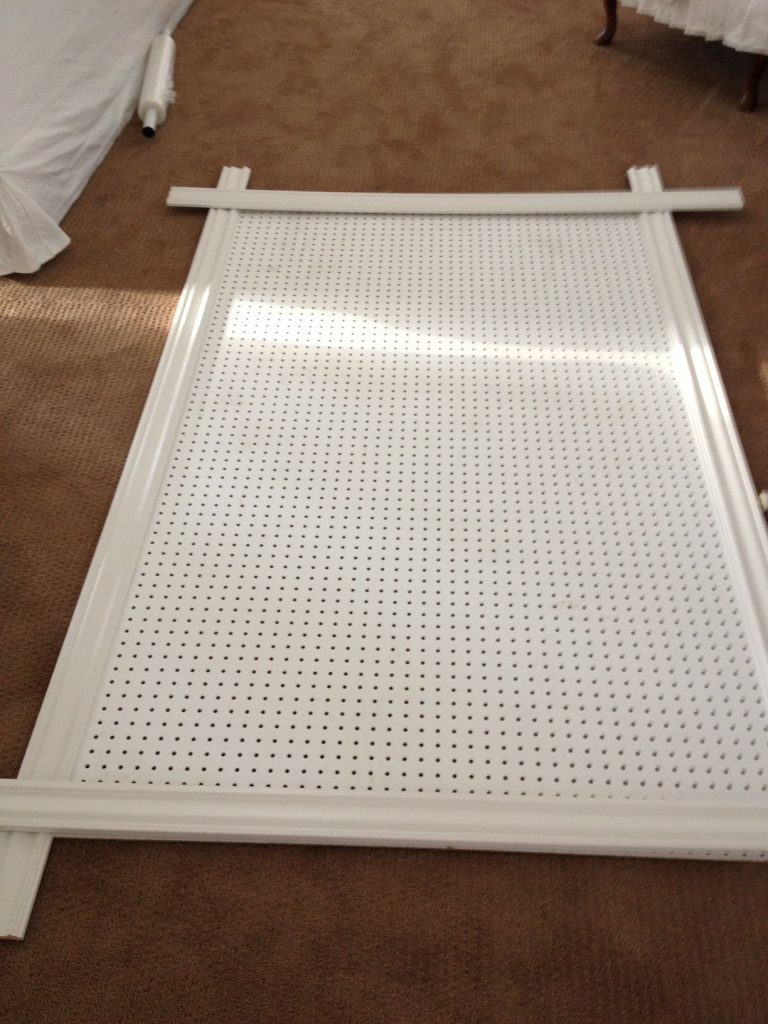
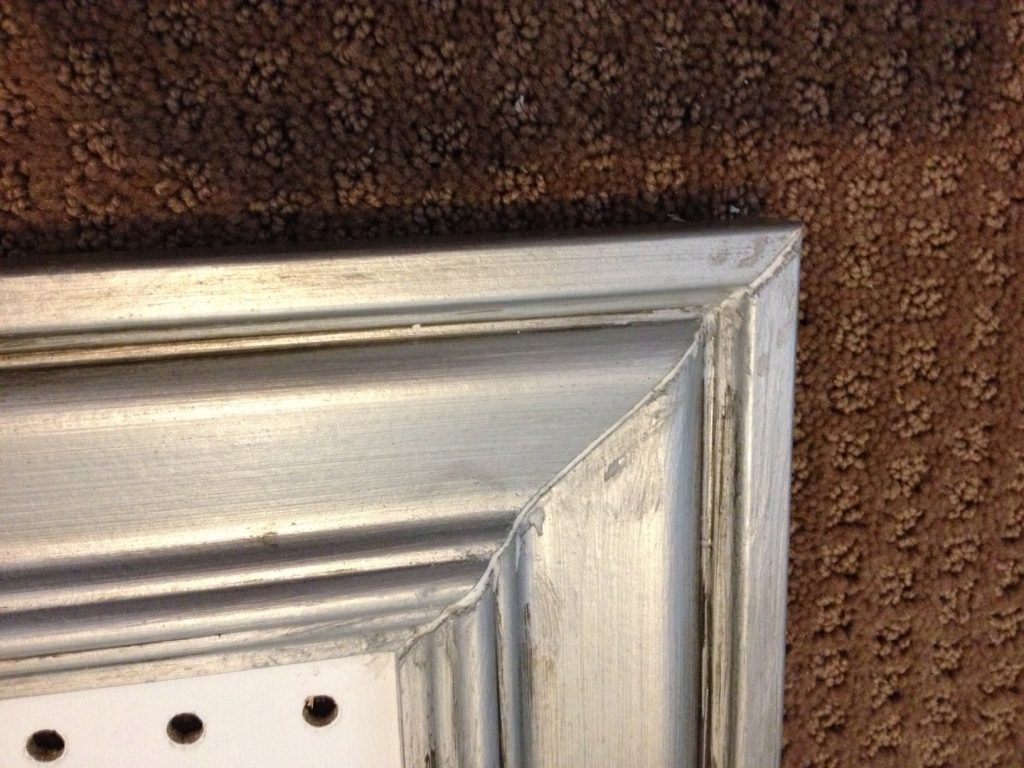
After your frame is secured to the pegboard, use the caulking to fill in the cracks of the mitered corners. Shoot the puff out and then make sure to wipe away the extra before it dries (I might have waited a little long to discover this and spend some serious time scraping away the excess.) You can touch it up with some paint if you need–this was easy for me because I just used the glaze to darken the white caulking. This might seem like an obnoxious step but I feel like it was worth it to make the frame look professional and finished. (The picture is before I touched it up!)
The pegboard itself is now ready, but here’s the big question–how do you hang this beast up? This wouldn’t be an issue for a small pegboard, since you could arrange the hooks on beforehand and then hang it flush to the wall. But this board is HEAVY and trying to get all that hardware up on it and not fall out would be a nightmare. Plus I wanted the freedom to rearrange the hooks as I pleased. This meant we would need at least a 1/4″ gap between the board and the wall for the board.
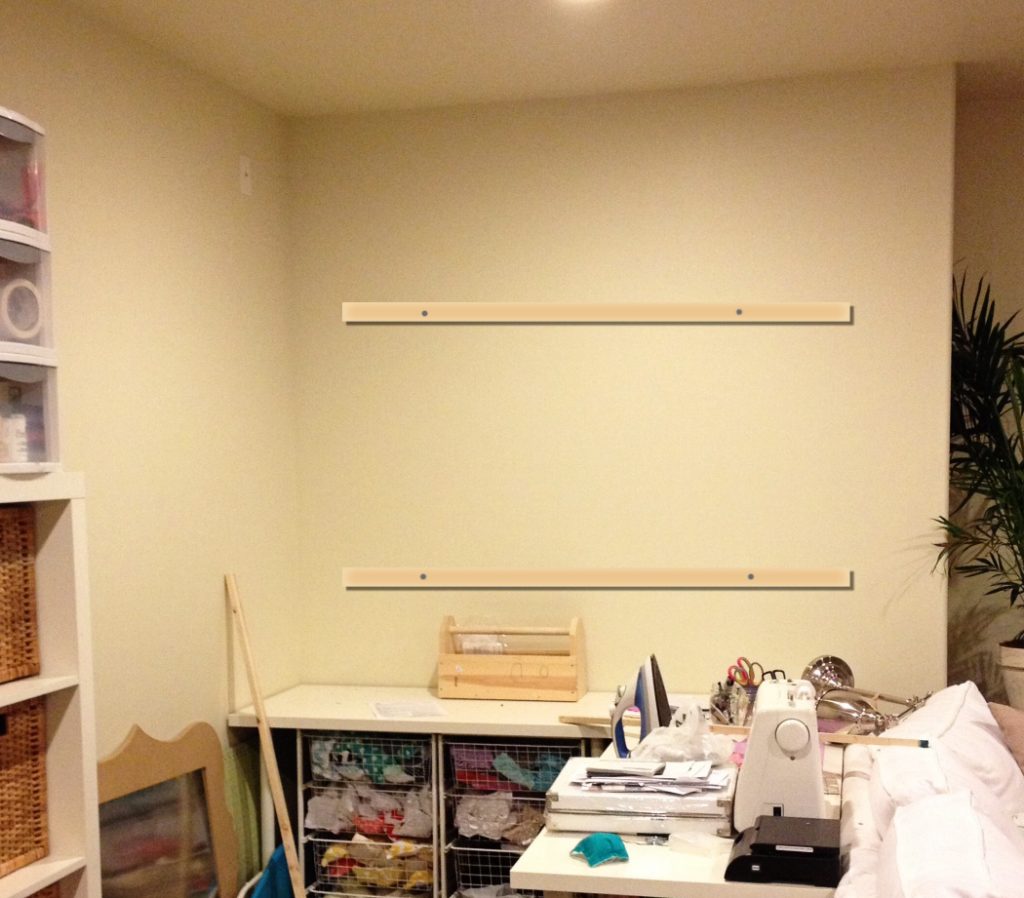
This is where the scrap wood comes in handy. I bought the super cheap CULL wood at Home Depot (it’s in the back by the saws and usually spray painted neon). I didn’t take a picture of the wood on the wall (dang it!) so I just used my photoshop skills to show you basically what we did.
My husband found the studs in the wall with a studfinder and then screwed the wood straight into them, one on top and one on bottom. Then we held the board up and he screwed the board right into the scrap wood. Now it’s very secure and I can move the hardware as I please. Plus since we are renters, this didn’t require us to but in one of those ultra-heavy duty screws that leave a quarter-size hole in the wall.
For the pegs, I bought two of the pegboard kits at Home Depot–two because there were certain pegs I wanted. I used large hooks for my wrapping paper dowels to sit on. For the vinyl organizer, I drilled holes in the frame about 2.5 inches apart and used screw in hooks for my dowels to slide into. 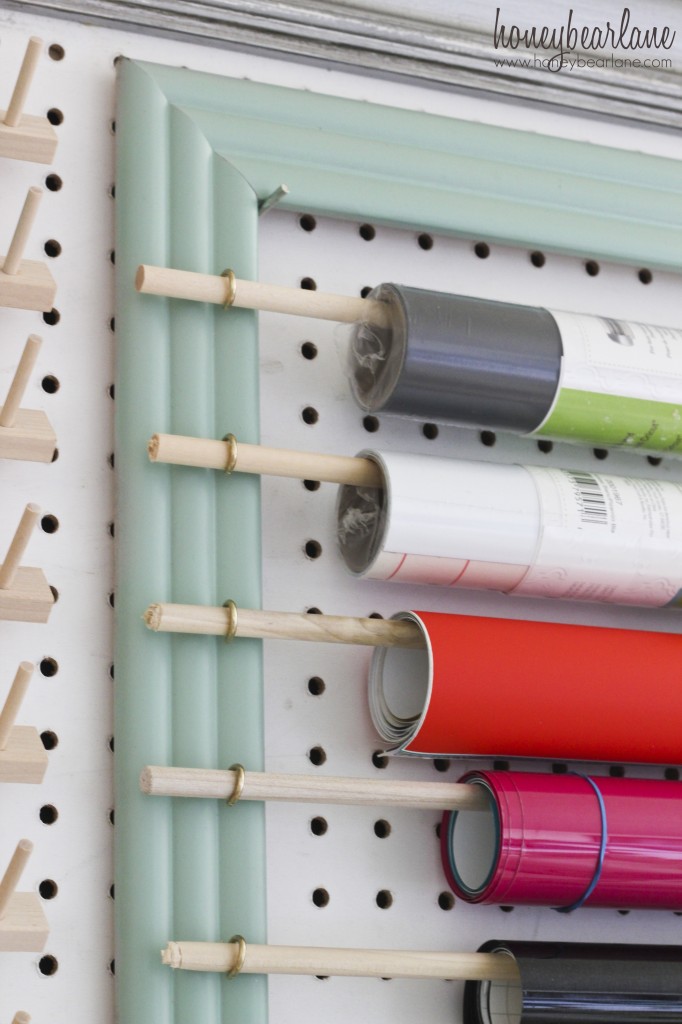
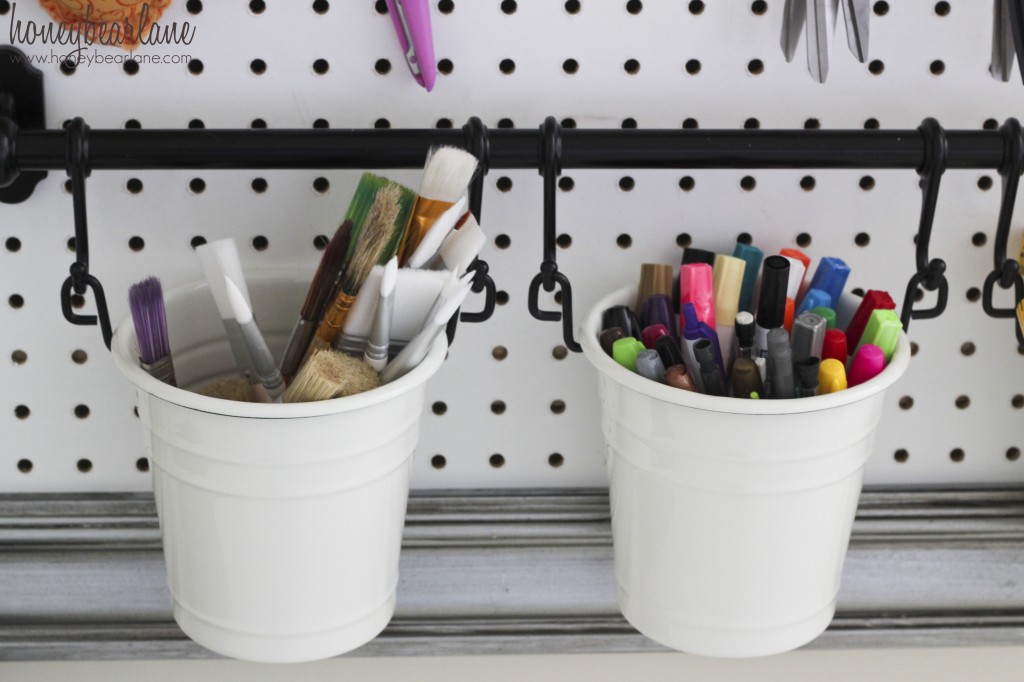
I bought the bucket set at IKEA. It was a little pricey so I recommend getting those $1 buckets at Target if you’re trying to do it inexpensively. But I was really in love with the look so I splurged on it. It’s in the kitchen section. And I had to attach this one before we attached the board to the wall because you have to screw it in from behind.
For the rest of the details on the other items, read the Extra Large Organizational Pegboard post.
Finally, I had a small area of space leftover after filling everything up and decided to put a framed quote up that I designed in Photoshop. Here’s the file if you’d like it for your own craft room!
This project was fun and very rewarding. I highly recommend making yourself a HUGE pegboard–it’s SO helpful for organization!


Your pegboard is amazing. I can’t believe how many things you were able to store on it. So practical, but beautiful too!
I also love the idea. But i live in Az. Very dusty. Any ideas on how to protect from.
My mother in-law taught me to tack a large piece of heavy clear plastic or vinyl to the very top so that the nails to not show. Then allow it to drape over the top. She has also done this with her sewing table to protect her thread when she doesn’t want to close up all the doors.
I cannot wait to make this! We just moved into our new house this week and I have a whole room for my crafts and I am beyond excited. 🙂
Yay for a new craft room! I’m jealous, I wish I had a whole room to myself. Someday!
Your board looks fantastic, Heidi! What do you use all that vinyl for?
Haha I actually don’t use vinyl that much which is why I HAVE so much. I went through this phase where I thought I would use it a ton so I ordered a ton. But now I mainly use it for stencils on small signs.
Thanks so much for sharing this, I was thinking of doing something like this, but not sure how…..and you have done it SO artistically! I am gonna do this.
Also, so sorry to hear about your terrible day, how scary and exhausting!! I will keep your baby and family in my prayers, I know what it is like to have your kids sick…. you feel so helpless! Add the snow, and that is crazy. Take care of yourself, you will get through it.
xoxo
Pam
Thanks Pam! I hope you can make one for yourself, they are awesome! And thanks for your sweet words.
I love this idea but I’m pretty lazy so I would probably go to my local thrift store or salvation army and get a big frame or 2 or 3 smaller frames and use them to “frame” the peg board. It would be easier and would also give me a chance to be creative in frame choices.
That’s actually a great idea! I have 2 old door frames with cute handles that came off of an old entertainment center. I took the glass out and sanded them a long time ago, knowing that would find a cute project for them. This is just the idea I’ve been waiting for!
Thanks so much for posting this with all the specifics and commentary. I need an extra large pegboard but I hate the look of it just plain on a wall –too utilitarian. But your framed look makes it both attractive and utititararian and should (theoretically) keep everything off my work table!
It has worked great to help me get organized! But I have to admit–I have WAY more stuff than fits on this pegboard and it’s still all over the table. 🙂
I just found this project today because Scrapbooking 24/7 shared it on Facebook. What a fabulous project.
I had a large UNPAINTED, unframed pegboard in my old craft room. It was not nearly so nice to look at as yours, and I never thought to use it with such versatility. I don’t have time for a new project, but I might have to MAKE time for this one; my craft room is a mess!
Thank you for sharing the idea and the tutorial.
Thanks for stopping by to read it! I hope you can make a craft pegboard too–this has been a HUGE help to me!
Hi, I have just came across this Amazing post and can i just say that you did a great job. I am just in the process of organizing my craft area and have been looking at ways in which to store my thread, and am so pleased i came across this, i am off to attempt this project hopefully this weekend. I am just wondering how did you make the thread storage bit? I am a newbie to DIY so would really appreciate to know how you did it.
Thank you.
I actually didn’t make the thread storage–they sell these at fabric stores! I got this at Joanns.
I love your peg board! I have a couple questions before I try to tackle one for my craft room. Is there a reason that I am missing that you have to use crown molding? Could you use just regular molding? And when you screwed it into the boards on your wall, did you just make sure to cover the screws with the stuff you were hanging on the peg board? So you don’t see them on the front? Thanks so much for sharing this awesome project!
I was wondering the same thing. Did you ever figure out how to make that work with the screws?
We actually drilled the holes through the pegboard, not through the pegboard holes. Two at the top, two at the bottom.
Hi! Just a tip for anyone who lives near a Big Lots… They carry the pegs and are cheaper than Home Depot.
Love your use of space the frame on the peg board is great. The dowel on the screw hooks would also be great to store ribbons.
Thank you for sharing this.
This is way cool! I am in the process of remodeling my craft room. I had thought about pegboard organization, but opted for wall slats with baskets to hold items. (You can see more information on this on my blog.) I might consider doing a smaller pegboard now to hold sewing items. Hmmmm…. decisions, decisions……
Amazing project – from start to finish. Thank you for the inspiration. I pinned this to Pinterest/homedepot on the “Small Spaces, Big Impact” pinboard.
Thank you thank you!
Amazing! Congratulations.
Hi Heidi! This looks amazing and I’ve been planning to hang a pegboard in my room as well to hold my jewelry. I have a question, what was the overall expense in making it?
I think it was about $30, since I had a lot of it on hand.
Just completed making two pegboards. One the large size that looks pretty much like yours and then with the leftover piece of pegboard I made a smaller one to place near my cutting table with rotary cutters and quilting rulers. I am so organized now and know exactly where the things I use the most are located. Thanks so much for the inspiration. All my crafting friends are envious.
Oops, just noticed I had typed my email incorrectly. Sorry about that!
I just love your pegboard! I have one but it’s not as beautiful as yours. I’m reorganizing my sewing studio and my pegboard. I will upgrade it with molding but i was wondering how you hung your thread organizer? Thank you so much for sharing your great ideas!
I ask Heidi, where can I buy small wine crates for glitters an paints….have the same. Can someone help me with where I can purchase them and brackets to hold up the crested.
Thank you
Chau
Brackets to hold up the crates….thanks
You can find a basic pegboard hardware kit at any Home Depot or Lowes type store…those will have the brackets to hold up your crates!
Thank you, where can I buy the wine crates?
I would imagine you can buy them where you buy wine. But I collected mine at thrift stores over the months.
I love your pegboard…actually I covet it! I am on the finishing portion of my version. Just waiting for the husband to put the boards on the wall to hang. Mine is 4×3′ and i painted it butter yellow. I then stenciled swirls in light gray. I was able to find “build your own frame” wood at Hobby Lobby for a total of $10. I transformed my smallest bedroom into a craft room. This is one of my favorite things in there since space is limited. Thank you so much for sharing this.
Sounds awesome! Great job!
This is just the neatest idea. I am in the process of setting up a jewelry studio in an unused bedroom and had thought of pegboard but never thought of framing it; what an excellent idea I never thought of using crown molding – heading to HD tomorrow!! Have never used a miter box but I have my Dad’s so I’m sure I can figure this out. Than you so much for taking the time to post such a detailed tutorial.
They are easy to figure out, just some manual labor involved! Go for it!
This is such a fantastic craft space!! I just bought my first house and for the first time am going to have a dedicated sewing room, rather than a “spread it all out wherever, like the living room floor or the dining room table, which never gets used for eating anyway because of the photo whitebox taking up the whole top” kind of situation! This post, and your craft room reveal are EXACTLY what I needed for inspiration!!
Thanks Laurel!! I hope your craft room turns out great!
You’re so right…thanks for “Spelling It out”.
Hi Heidi!
I’m in the midst of making this framed pegboard and had a question. Since I couldn’t find black glaze I bought black paint and then just regular clear glaze, would I be able to get away with it and what did you use to wipe away the black glaze when you did?
Thank you so much!
You can mix the black paint with the glaze to make a black glaze. Then just wipe it away as normal.
Kia ora from New Zealand! I have almost completed my pegboard thanks to your tutorial, I just love it! Could you please tell me what size/capacity your little buckets are? There are so many on the market, but obviously the correct size is important to fit the rail. We don’t have them in our ikea store here. Much appreciated!
I am in the “new sewing room” process. Planning on your great pegboard. Can you please tell me the placement of the two hanging boards you screw into the studs? Where will they end up after the board placement?
They are about 10 inches in from top and bottom. good luck!
I am working on a similar pegboard sewing and craft space right now and I want to know exactly how you attached the thread rack to the pegboard? I cannot find any pegboard thread racks for sale and I could make one with wooden dowels glued into my pegboard, but I don’t want it to be permanent since I am just beginning to learn how to sew and might want to enlarge it someday or move it around. I love what you did!
Wow–you couldn’t find any thread racks? I thought for sure they would be at any Joann’s. I just used a pegboard hardware kit and use some of the ‘L’ shaped pieces to hold up the whole rack.
I love this and am using it to help me get my craft/fabric room together. I have the IKEA bars too, to hang the buckets on. How did you attach them to the pegboard? I already hung my peg board and cant reach behind it? Did you hang them before you hung your pegboard? Thanks!
I love this! I’m doing the same thing and am wondering how you attached the ikea rods. I have them too! 2 problems- They don’t line up with the holes. And I already hung my pegboard. Did you hang your rods before you put your pegboard on the wall? And did you just use screws and washers?
sorry for the double post. Didn’t see it load 😛
I just drilled holes straight through the pegboard, on the parts without holes. I screwed one side in and then put in the rod and then the other bracket and drilled that one.
What a fantastic craft organizing idea! I am totally going to do this! Thank you for sharing!
so pretty , love it and I also made same one
Thank you so much! Your method for hanging it is much easier than some of the others I have seen.
Questions – Where do the nails on the back go? I don’t have a staple gun. Did you use plain old screws to screw in the scrap wood?
Thanks in advance
I just finished mine!! Wish I could send you a picture. I love it!!!
You can send a picture to honeybearlane@gmail.com–thanks!
I like this idea very much. We thought about organizing my sewing stuff on the wall, too.
I’ve never seen a pegboard before.
Can you answer me one question, then I might be able to make one!
How thick would this sheet have to be?
Pegboard is sold at home improvement stores in 4×8 sheets about 1/4″ thick. They also sell pegboard hardware there.
Thank you for the tutorial! Found it last name got and am headed to Home Depot this morning! Woo hoo!
Where did you screw in the pegboard to the pieces of wood?
Just wherever made sense. I didn’t use the holes in the pegboard though.
Awesome! This project jest got added to my husband’s “honey do list” ! He loved the idea so much he’s going to “help” me design TWO……one for home and one for our retreat! The idea of my spaces have some organization thrills him to no end LOL!
Thanks!
Awesome!
Hi there!!
Love this! Can you provide sizing for the frame, dowels, and hooks you used for the vinyl holder?
Thanks!!
I love your peg board and how you put all the thread on it. I hope my pegboard turns out as nice.
Hi! I love these pegboards! Where can I get those hanging buckets and those hooks and that ..black tube?
They are from IKEA.
I am going crazy trying work in my small sewing area. I do a lot of patchwork and dressmaking for people. I just dont have enough room (or organisation). I love your pegboard and thought the boxes would help.
What sort of boxes did you use please?
Thanks
I’m not exactly sure what boxes you are referring to? I have a few wooden boxes for paint and glitter and they are just wood crates I found at a thrift store.
why does generic viagra work [url=http://gabinet.tk/]recommended reading[/url]
generic viagra yet [url=http://citicism.tk/]linked here[/url]
e-generic viagra [url=http://shakhtarfan.ru/]look at these guys[/url]
generic viagra drug interactions [url=http://woomenot.ru/]visit their website[/url]
generic viagra side effect here.
viagra generic or brand see this here
heb generics viagra that site
when will a generic viagra be available look at this
Приветствую всех! Класный у вас сайт!
Что думаете по этим новостям?:
http://enewz.ru/11048-smi-ssha-predostavlyayut-kievu-sputnikovye-dannye-o-raspolozhenii-opolchencev.html [b] СМИ: США предоставляют Киеву спутниковые данные о расположении ополченцев [/b]
http://enewz.ru/34456-pochemu-rossii-ne-nuzhno-razmeschat-yadernoe-oruzhie-v-krymu.html
война и мир событие http://enewz.ru/v-mire/
новости науки энергетики http://enewz.ru/energetika/
Ещё много всего нашел тут: [b] новости российской политики [/b] [url=http://enewz.ru/]http://enewz.ru/[/url]
Hot galleries, daily updated collections
http://pornaspenrae.relayblog.com/?quinn
dhoodwali porn david tennant porn japanese specific porn coco porn pic gallery craig ashton porn
Dirty Porn Photos, daily updated galleries
http://thai.porn.relayblog.com/?reyna
free older men younger porn clips free britney and christina porn xxx shemale sex porn who is cora porn tattoos long fuckin porn videos
cool training [url=http://nottsgroups.com/story/380210/]useful link[/url]
look what i found [url=https://imgur.com/a/mOW8eHk]click for more info[/url]
via [url=https://www.duno.com/cbd-oil-blog]like this[/url]
navigate to these guys [url=https://www.smore.com/zjyen-hemp-oil]read this[/url]
Continue click here for more info
article source look these up
my sources official site
prev read more here
what does generic viagra look like [url=http://ooobskspetsavia.ru/]learn more[/url]
generic viagra price 2018 [url=http://www.forum.kg/]address[/url]
generic viagra blog [url=http://ltdcargo.ru/]try these guys out[/url]
generic viagra rexall [url=http://blockadekonferenz2013.tk/]get more[/url]
generic viagra for pulmonary hypertension browse around this site
how much will generic viagra be straight from the source
generic viagra december 11 click
generic viagra color click resources
Всем привет.Специально для Вас сделал подборку очень полезной информации вот тут вот что этот плюшевый Львенок станет постоянным спутником малыша.современные производители беспокоятся о качестве своей продукции, выбирают только безопасное покрытие, не вызывающее аллергию, изготовленное из нетоксичных материалов.
College Girls Porn Pics
http://real.porn.relayblog.com/?audrey
celebrity anime porn videos teen skirts porn porn sites torrents comic slut porn porn 4 pods
Free Porn Galleries – Hot Sex Pictures
http://natrul.tits.relayblog.com/?taniya
ha rdcore porn serenity wild porn sta free clips young porn the new queen of porn noeli blond porn xxx